Playing with your food: making a fondant cake with kids

by Carly We love winter and the Little Man is no exception.  He'd play outside all day everyday if we'd let him and I'm thrilled he enjoys the out-of-doors as much as we do.

But even us winter-lovers have days where the thought of getting dressed to roll around in the snow is just too much.  We were having one of those weekends and after exhausting every episode of Handy Manny and The Mickey Mouse Clubhouse on Family on Demand, it was time for a new game plan for our Saturday.

Earlier in the week Jake was upset about being told that he couldn't help me with the snowflake-themed cake I was making for a bridal shower.  He loves playdough and when he saw me rolling out all that fondant he just really wanted in on the action.

We had a chocolate cake mix kicking around and some leftover fondant so while Jake was watching all those Handy Manny episodes, I made the cake and coloured the fondant.  Then we went to town.

Jake had a blast rolling, cutting and "painting" the fondant.  He was thrilled to invite Nana and Papa for supper and beamed when he passed around pieces of his cake for dessert that night.

Want to do it yourself?  Here's how . . .

Make some fondant from scratch or do what I did this time around and pick up a box of pre-made white fondant from Michael's, Bulk Barn or your favourite cake supply store.  I used a 24 oz. package for the cake you see here.

Make your favourite cake, cool for 10 minutes in the pan, then remove it and put in the fridge so it'll cool that much faster.

While it's baking and cooling, pull off small balls of fondant from the larger piece and tint it different colours.  I used paste colouring, but for small amounts like this, you can use liquid food colouring because you don't need a lot.  Each coloured ball that I made was about 1.5 inches in diameter.  If the balls get a bit sticky, add icing sugar (not flour!) to them as you knead in the colour.  Keep your fondant in plastic wrap or a sealed baggie so it doesn't dry out when you're not using it.

Because we made a chocolate cake, I tinted the rest of the fondant brown, but you can leave it white or make it any colour you want.

When the cake is cool ice it with your favourite kind.  Buttercream, cream cheese, canned . . . it all works.

Roll out the largest ball of fondant to about 1/8" thick.  Use icing sugar (not flour!) to keep it from sticking to the counter or your rolling pin.  If it gets a little dry, you can use vegetable oil or PAM to keep it from sticking or drying out.  Place it over your cake, smooth it out and trim the excess.

(You can completely skip the step above and just lay your cut out fondant directly on whatever icing you chose, if you'd rather!)

Get out everyone's  favourite cookie cutters, pull out the coloured balls and start playing.  The cut-out fondant will stick to the cake if you "paint" the back with water.  If there's too much icing sugar on the front of the pieces, "paint" the fronts too after you put them on the cake.  If you have clear vanilla, almond or lemon extract, you can paint the fronts with that instead for even yummier fondant.

I have letter-shaped cookie cutters, so I made our play time into a teachable moment by sounding out and spelling the names of our family members.

I just let Jake create whatever he wanted, regardless of how the cake looked.  In the end there so much fondant on the cake, we couldn't possibly eat it all.  I don't even like fondant that much.  But that's the beauty of fondant - you can just peel off what you don't want and eat the cake and icing underneath.  Mmm!

Carly has red hair and occasionally the temper to match.  She loves potatoes, rainy nights, photography, her husband and her 4 year old son, Jacob.  Probably in reverse order.   She also blogs.

Cooking together - kitchen sink pasta

by Krista As soon as my children were old enough to help out in any way, I started to involve them in the preparation of our meals. I have fond memories of "helping" my mom in the kitchen as a child, and I hope that this involvement will lead to the same. I also want to pass on my love for cooking to them and in the process, let them see what goes into our meals. The best reason that I have for including them in the meal preparation is that they are more likely to eat the food that we prepare without trying to pick things out if they are part of the preparation.

My little sous-chefs started out with pretty simple tasks, like moving ingredients from the cupboard, or pretending to measure things for me (while they were really just playing with the measuring spoons). They have gotten to the point where they can, while being WELL supervised, hold the mixer/hand blender, add ingredients to or stir a pot on the stove, and roll cookies or fill muffin cups. Most of the cooking that I do these days is with a child on each side of me, standing on a kitchen chair and helping out. They take such pride in this, and truly love the food that they create.

We recently made a quick and simple favourite together, I like to call it our kitchen sink pasta. They like it, because there are lots of their favourite veggies in it, and there is lots for them to do in the preparation. I like it because there are few ingredients that need to be chopped, it's nutritious, and only takes about 20 minutes to make.

1/3 cup pine nuts 3 cups of penne 1 tablespoon olive oil 1/2 cup vegetable broth 2 cloves garlic, minced 1 red or orange pepper, sliced 1 cup corn kernals (fresh or from frozen) 1 cup peas (fresh sliced snow peas or frozen) 3 cups of baby spinach, washed and dried 1 cup cherry tomatoes, sliced in half dried or chopped fresh basil to taste freshly ground pepper to taste freshly grated Parmesan cheese

Advance prep work: In toaster oven, toast the pine nuts for about 4 minutes (until slightly golden). Slice peppers, tomatoes and snowpeas (if using)

With the children: Start the water boiling for the pasta. Once it boils, add the pasta. My children like to help here, but you have to be careful that they aren't too zealous and get splashed by boiling water. I use a ladle to let them tip the pasta into the pot. Cook until al dente. Let the kids test the cooled noodles to tell you if they are done before draining. Set pasta aside, but the veggies should be ready at about the same time.

While the pasta water is starting, have the kids help to measure out the veggies and put all but the spinach, tomatoes and pine nuts in a bowl. In a large frying pan with a lid, heat the oil. Add the broth and garlic. Have one of the children pour the veggies into the pan (or take turns pouring). Sauté them for a couple of minutes, then reduce heat and add the basil and spinach. My children like to do this, they get to throw handfuls of spinach into the pot. Cover and let the spinach start to wilt. Stir occasionally to mix everything together. Once the spinach is fully wilted, have the children add the tomatoes and pine nuts and stir them in. Cover and let sit, on very low heat, for another minute or two. You want the tomatoes to soften, but not be mushy.

Mix veggies together with the penne and serve, topped with the pepper and parmesan. Enjoy!

Krista is married to Willy and mom to a 3 year old son, Woo, and 1.5 year old daughter Goose. You can find her at Life in the Hutch or on Twitter @kgraydonald

Cheese train

by Krista My children are generally good eaters, but like most, they go through fussy periods. Times when they will not eat meat or veggies or fruit, or some days when they will not eat anything that I offer them. It was during one of those periods that Woo and I were reading Chirp and came across a cute little snack idea that they called a "cheese train". It was basically a little train made out of cheese and tomatoes on a skewer. "Can we make that?", he asked, with big excited eyes. I assured him that we could and we finished our reading.

The next morning he woke up and came to my bedside to ask if we were going to make the cheese train that day. Then, as I was writing up our grocery list, he asked if I had added the food we needed to get make the trains. When we returned from the grocery store he asked if we could have them right then. He was EXCITED. I convinced him to wait until lunch, and figured out ways to beef them up so that the children could get a full lunch out of them. They were a great success and have become a regular feature at lunch time around here.

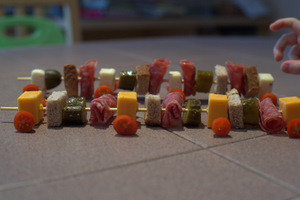
What you need is a couple of shish kabob skewers, small toothpicks, the items that you would normally put into a deli-style sandwich, and some cherry tomatoes or olives to act as the wheels. We usually us a couple of different kinds of cheeses, bread or buns, pickles, and some meat, either leftover chicken, deli-meats, or salami/kielbasa. All of these, except for the "wheels" are cut into cubes and then threaded on the large skewer to make the train's cars. You then take the smaller toothpicks and push them through some of the firmer items (I go through the cheese) to act as the axles. Then I cut the tomatoes/olives in half and attache them to the axles. The end result looks something like this:

As you can see by the hand reaching for the trains in the picture, they are well received!

Krista is married to Willy and mom to a 3 year old son, Woo, and 2 year old daughter Goose. You can find her at Life in the Hutch or on Twitter @kgraydonald

Making pizza!

by Vicky Pizza is a big favourite in our house. If the boys had it their way we'd be eating it every day. We often make our own pizza from scratch, including the dough. My husband has perfected his dough technique using a great recipe we found on A Peek Inside the Fishbowl.

Whenever we do make home made pizza, I give Joel his very own mini pizza to decorate. I put all the ingredients in small bowls and let him decide what he wants on it. It's a great activity which gets him involved in cooking without a lot of the mess. He's always eager to eat a meal he helped prepare!

Do your kids help you make pizza?

Vicky is the mom to 4 year old son named Joel and 19 month old daughter named Mieka. You can read her blog at blog Some Kind of Mom.

Vegetables - the easiest recipe EVER

by Lara I don't mind cooking, but there is little more frustrating than slaving over a meal only to have all of your children spit it out in disgust; refusing to eat a single bite. That meal they devoured last week? This week -  apparently revolting. Fun times!

Although they would happily exist on cheese, yogurt and bananas, I do try to mix things up a bit for them. Vegetables often aren't a hit - drizzle them in butter or cheese and they are no better. Generally if I want them to eat vegetables I need to use "the trick".

I think my mother in law first told me about it - her "Kiernan ate a TON of peas today" me "really??" her "ya, he really likes frozen peas" me "interesting. I'll have to try that. How do you cook them?" her "no, he likes them frozen".

Oh of course! He won't eat my cooking but FROZEN PEAS? OK WACKY KID.  But whatever works right?

Here's the thing, it wasn't just Kiernan! All three of my kids will happily munch down on tons of vegetables, if I give them to them right out of the freezer like popcorn.  Cook them, or god forbid they thaw them a bit and they aren't good.  But hard as rock peas, corns and carrots - YUMMO!

And ever since Jamie Oliver's food revolution taught me that frozen vegetables are actually really healthy, I feel like mother of the year as I throw some frozen vegetables in a bowl for dinner and forego cooking all together!

Lara is mom to 4 year old Kiernan and 1 year old twins Quinn and Juliette. You can read her blog at Gliding Through Motherhood.