by Carly
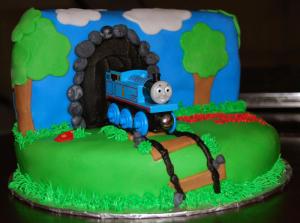
So the Little Man was fast approaching his fourth birthday. For the last few months the Thomas obsession has grown to staggering proportions; it’s all Thomas all the time and you can’t move through our family room without impaling yourself on a train or six. What’s a mom to do but make a Thomas-themed cake for the upcoming par-tay.
My mother always made our cakes as children and I’ve long desired to do the same for my family. But a Thomas cake?! I can’t begin to tell you what an amateur I am and how deep my fear of 3-D cakes runs. Not the actual cakes - that would be silly - but the making of them. Not so much.
So I did what any good mom would do: before calling the bakery, I called Google. Remember when you had to go the library to find out stuff? Google was a treasure trove of Thomas cakes. All them either baked in a special train pan or molded out of cereal treats and modeling chocolate. Clearly that wasn’t going to work for me so I was thrilled to find a version of the cake you see below that involved a simple round cake and buttercream.

Before I get into the nitty gritty details and in the interest of full disclosure, I feel I need to tell you that for the masterpiece you see below I used a cake mix, a buttercream mix, canned icing and pre-made fondant. And I’d do it all again. Finally, lest you think the fondant is beyond your abilities, you should know that this Thomas cake was only my third attempt at using fondant. You’ll never know unless you try so roll up your sleeves and think of it as play-dough for grown-ups!

Here’s what I used, but feel free to substitute your own recipes in place of the mixes:
- 2 Cake Mixes (any flavour you like)
- 2 14 oz. packages of “Creamy White Buttercream Icing Mix”
- 1.5 24 oz. packages of “Ready-to-Use White Rolled Fondant”
- 1 Can “French Vanilla” icing
- 1 Tube black decorating icing (or you can tint some of your buttercream black)
- 2 tsp. CLEAR vanilla extract
- Eggs, Milk, Butter, Water & Oil as called for in the cakes and buttercream mixes
- Icing Sugar to roll the fondant on
- Green, blue, brown, black and red food colouring concentrated GEL (or paste)
- Large ziploc freezer bags
- No. 11 round decorating tip
- No. 3 round decorating tip
- No. 233 decorating tip (grass)
- Coupler (fancy name for this )
- Flower cookie cutter
- Rolling pin
- Wooden (or plastic) Thomas the Train
Here’s how it came together:
1. I used the equivalent of two cake mixes to make three 8” (or 9” - we’re not picky) round cakes. The leftover batter went into the cupcake tray so as not to waste it. I prefer to grease and flour my pans before pouring in the batter.
2. Bake the cakes according to the recipe you’re using and allow to cool 10-20 minutes before removing them from the pans.
3. While you’re waiting for them to cool, ice a cupcake and eat it.
4. Remove the cakes from the pans and let cool until they’re cold to the touch. I put mine in the fridge to speed up the process.
5. While the cakes are cooling completely, make some buttercream icing. I added about 1.5 teaspoons of clear vanilla extract (not in my recipe) for a yummier flavour.
6. When the cakes are ready, level the tops of all three cakes with a serrated knife. I just eye-balled it, but you can use a special cake leveler if you’re so inclined.
7. Save the tops for your husband. It makes a nice thank-you treat for the help cleaning up you’re going to insist on later.
8. Cut two of the round cakes in half and stack three halves on top of each other to form the sky/tunnel. I used canned icing in between the layers because I like it. You can use that or a light layer of buttercream.
9. Save the fourth half for your husband. See number seven.
10. Crumb coat/dirty ice (see how I’m now trying to impress you with my technical terms so you’ll forget I’m using mixes and pre-made fondant) the stack of cakes. This just means you use a thin layer of buttercream to make everything stick together. It won’t matter if there are crumbs peaking through, but try to make the buttercream as smooth as possible to avoid lumps in the fondant. My cakes almost always break, crumb or crack a little and I use the buttercream to “glue” those areas and build up any part of the cake that’s not level.
*TIP* Use a butter knife or metal/stainless spreader for the icing work. Never use a plastic spatula. A knife will give you a more even coat and fewer crumbs/breakage in your cakes. Keep the buttercream in a ziploc baggie or covered with a damp cloth/plastic wrap so it won’t dry out.
11. Crumb coat/dirty ice the remaining (whole) round cake.
12. Put the stack of half cakes and the whole round cake in the fridge to set. This is especially important if you’ve had to “glue” your cakes.
13. Take a much needed break. I like to set my cakes for at least 30 minutes, but often wait an hour.
14. Open a package of fondant. You’ll need about 12 ounces (about half the package) of fondant to cover the base of the cake. Sprinkle some icing sugar on the counter and knead in some green food colouring. This is where the gel or paste kind works best, because the colour will be more true, you won’t water down the fondant, and you won’t need as much of it.
15. Pull the base of the cake out of the fridge and spread on another thin layer of buttercream. This is to give the fondant something to stick to and a sweeter taste to the cake. Make sure the icing is as smooth and level as possible.
16. When you’re happy with the fondant colour, roll it into a circle-like shape, about 1/8 of an inch thick and a two inches bigger than your cake. Keep adding icing sugar to the fondant/counter/rolling pin so the fondant doesn’t stick.
*TIP* The thicker you roll your fondant, the less likely you are to see any bumps that still exist in your cakes. Don’t make it too thick though, or your cake will fall over! Keep as yet unused fondant in ziploc bags so it won’t dry out - it happens faster than you might think!
17. Brush any lingering speckles of icing sugar off the fondant with your hands and carefully lift it over the base of the cake.
18. Pulling gently on the edges, smooth it out around the sides. Using a butter knife, cut the fondant from around the base of the cake. It doesn’t have to be perfect, you’ll cover it up later.
19. Tint some buttercream green and using the grass tip (No. 233) pipe grass around the base of the cake. Rather than expensive decorating bags, I use large ziploc baggies for holding my icing. Put the cake back in the fridge. Keep the green buttercream with grass tip attached. You’ll need it again.
20. Repeat steps 14 to 18 for the top of the cake, using blue food colouring instead. You’ll need slightly more fondant this time so break open that second package and use about 18-20 ounces in total.
*TIP* Covering the top of stacked cake halves was a fair bit harder than the round base. Go ahead and trim then tuck in the corners/edges and smooth them out as best you can. Don’t worry about a seam showing through - you’re going to cover it up with trees later.
21. Bring out the base of the cake and spread a thin layer of buttercream on the top half of it. Carefully place the stacked top piece on the buttercream.
22. Put it back in the fridge to set and have another cupcake.
23. While the cake is setting, tint some fondant red for flowers, green for tree tops and brown for tree trunks and railway ties. Leave some white for the clouds.
24. To make the stones surrounding the tunnel, tint fondant with a very small amount of black food colouring gel, but don’t mix it too much - leave it speckled and grey. Roll small amounts in balls.
25. Time to start decorating and finishing the cake! Using a knife or metal spatula, spread some black icing (I used it pre-made from a tube I already had, or you could tint some leftover buttercream) onto the sky to make an upside down “U” shape. It doesn’t have to be perfect - you’ll cover up the edges with stones.
*TIP* Have a small bowl of water handy. With a paintbrush or your finger, use the water to attach the fondant cut outs to the sky and base.
26. Squish the stones you made into various shapes and attach them to the cake around the tunnel with a dab of water on the back of the stones.
27. Roll out the brown fondant and make some tree trunk shapes. I did mine free hand with a butter knife and smoothed out any rough edges with a finger dipped in a bit of water. I deliberately put one on either corner to cover up the seams in the blue fondant.
28. Roll out some green fondant and using the flower shaped cookie cutter, make some tree tops and attach them to the cake. Layer them on top of one another for a more three dimensional look, if you like.
29. Roll out some white fondant and using the flower shaped cookie cutter, make some clouds. Before attaching them to the cake, stretch the shapes out to look more like clouds than flowers.
30. Repeat with red fondant to make flowers.
31. Pipe some green buttercream where the top cake meets the bottom cake to make a grass border around it, covering up the seams.
32. Using the brown fondant, cut some railway ties. I did mine free hand. Place them on the base of the cake using a bit of water.
33. Using the black buttercream (or leftover tube of black icing) and a No. 11 round tip, pipe the outline of the railway tracks.
34. Add some extra stones and pipe on some more grass around the tracks for decoration.
35. Tint some leftover buttercream red and using a No. 3 round tip, pipe on the birthday message.
36. Add Thomas to the cake and in just thirty-six short steps, you’re done! The cake will keep overnight on the counter, as long as it’s not too hot. If you’re worried, keep it in the fridge.
Despite the many steps, this cake is actually much easier to make than it looks. If you tried the fondant and it just didn’t work for you, or if you’re not up for it at all, you can skip all that and decorate it with tinted buttercream instead. Either way I’m sure your Thomas fans will be thrilled. Just try not to cry (not that I’m saying I did) when the kids dig into it.

I'm Carly. I've got red hair and occasionally the temper to match. I love potatoes, rainy nights, photography, my husband and my 4 year old son, Jacob. Probably in reverse order. But only when he sleeps through the night. Jake, I mean, not the husband. But him too. I like sleep . . . and hate mayonnaise. You can read more about our family at http://talkingmyselfoutofthetree.blogspot.com/.

 We have more baking planned in the coming weeks, with sugar cookies up next! The recipe, if you are interested is:


